martes, 4 de septiembre de 2012

HDRI & first half footage ready

So I went yesterday with Ben and David to City Hall, the most futuristic - looking place in London that Google could suggest. They (Ben & David) were really helpful on HDRI tech support and carrying the stuff around, which  is highly, highly appreciated! (I am small and weak and with no physical condition to be wandering around London packed like a small little mule without collapsing, you'd have to shoot me dead eventually). So I suggest you to give them some extra marks on their respective projects, you know,  for the niceness factor :)

Here are the results:


Basically, what happened was taking 6 photos of the same ball using bracketting (however you spell it) at different exposures, then blending them together in Photoshop using the "File > Automate > Merge to HDR" approach. Since my main computer is busy rendering and this one is not that powerful, each image took quite a while to be composed. Then I used a filter to unwrap it, under Filter > Distort > Polar coordinates, choosing "polar to rectangular". This was under my own knowledge of Photoshop corners & mere logic, and not a proper proven method, which by the way is yet to be tested so it might be wrong. If that turns out to be the case, I will come back later and state it. 

Video footage is still in original HD resolution, and the computer with the kickass video editing software has spent 8 hours rendering a 4 seconds scene in Maya and is still on that, so I can't touch it, even less open After Effects to create a smaller, internet-friendly video for you to watch, so you will have to use your imagination and / or trust my word :)  More on render soon. 


martes, 28 de agosto de 2012

Meet Lukka!

Finally!  After days and weeks of suffering with London overall self righteousness regarding animal welfare - where you are suspected to be the Dr. Strangelove of the cat world until proven otherwise - I could find finally my superstar:


Thank you very much to all the people who were supportive and understanding!

Shooting has been delayed for several reasons, the first one was to get the actual kitten, second one was to book the green screen room, since is vacation period and all the staff is off for holidays. I actually order myself a green screen on eBay  so I could get myself an alternate method but, heh, never arrived.
After some glares from people in the overground due Lukka's cries for help while transporting him to Kingston (no, people, I am not killing him with my mental powers, he is a cat and cats get stressed and noisy at things they don't like, such as other cats, being transported in a cage on the overground...


Infinite inspiration for captions all over the internet.

... and geez! I bet you would have run to call the RSPCA at speedlight if you would hear him get mental towards me washing his footsies the other day! I actually got a couple of handsome deep scratches at my wrists, good for me they came late enough or I would be mocked with the Emo label for the rest of the course by my classmates! Ohhh Nell but you shouldn't have put him in such stressful situation, cats don't need to be bathed! they loathe water! Yehhh... I think allowing your cats to run around with poop on their feet and lick it off with their own tongue would be a better solution for you, right? Well, you can get all the pooplicker cats you want, I'll wash him off and you shut up!

At the end I risked it, took him out from his cage and cuddled him against me, fortunately that worked and he calmed down. At the end we got some lovely footage:


... these, among others. Final shots didn't turn exactly as shown in the previous animated gifs, but that was expected, we didn't force Lukka into anything, just let him be, and fortunately he gave us most of the footage needed, which, with the magic of Edition, we will make work:


Example: in the above video we can see Lukka just plain being lazy over the "green screen"... which is actually a piece of green fabric I found lying around the flat. These were the first improvised test shots with no proper equipment, yet still turned out pretty ok.


Now, with some cropping, rearranging and reframing, we can get a sad kitten that looks how an android pal walks away, being slightly hurt about it. Same footage, just polished.


... and this is the story of how I came to update the blog because Maya keeps on crashing when I try to render in MentalRay and the normals are coming up hideous and I want to die. 

miércoles, 15 de agosto de 2012

Advanced Skeleton

Time has come to start with the rigging process. Due to time constraints, and the fact rigging is complex, timeconsuming and I completely hated it during the previous module, I decided to google around for tools that help me speed up the process. I found Advanced Skeleton, by Øyvind Nøstdal:


Process was pretty straightforward, yet still I couldn't manage to get it work at the first try, so I will list here a couple of tips in case you decide to use it and help you not to get stuck:

1. When they say you shall not move the joints beyond the X axis and you should rotate the previous joint to place them into position instead, they mean it! Not being careful enough about the orientation of your joints from the start leads to funky controllers, and try to fix it later leads to weird mirroring. 

2. If you happen to load a reference that has many layers and you happen to group them, skinCage's "copy skin to selected mesh" won't work if you select the mesh by selecting the group in the Outlier. You will have to select mesh by mesh inside the group node, and press the button each time.

3. Do not touch the "delete all by type" menu. Just stay away!

4. If you ever get this error while working:


... go erase your temporary files from your computer. 
I use a tool for that called CCleaner, is freeware and keeps your computer fit. 

Body rig seems to work wonderfully so far. I will keep on working on the facial rig and come back with updates.

jueves, 9 de agosto de 2012

Cat Casting

When I stole Lee from the Knightside Chronicles team last week and told him about this alternate project, he said his main concern was the real cat acting part. Being a cat person myself my whole life, with the superpower of knowing which parts of a cat's body to scratch to make him love you forever, plus thinking beforehand in the shots so I can easily tell the story with footage that lets the kitten be himself instead of attempting to make him act, I told him I was confident that part wouldn't be a major problem.  Will be? Will not be? There is only one way to find out!

Funny as it comes, the hardest part so far has been to find the actual kitten. Being an overseas student that just arrived months ago gives me the ability to know very few people in this city, most of them also non London based students  with similar projects and a total lack of kittens among their belongings, so I started my cat quest, posting on DeviantArt, Digital Media Kingston group asking for help and referrals, contacting shelters, calling breeders, posting in specialized forums and placing ads in Gumtree. Apparently, is a weird thing to ask for since shelters didn't answer, breeders told me off, Gumtree took my ad down (I actually got some people interested from there, but after couple of mail exchanges they stop replying). Got some lights in one specialized forum, where an user pointed out it was weird to give away your pet to a total stranger, which makes sense. I asked what should I do in order to make my project believable and break the menacing stranger stigmata, and someone suggested for me to explain my project further, what I plan to do and how, so, ladies and gentlemen:

"The train" video: kitten footage planning.


PROFILE: 
  • A kitten between 8 and 16 weeks old.  This comes to the fact that older cats are less active and willing to move, also, more difficult to handle.
  • Not black, not 100% white. This for Chroma key purposes, a 100% white cat might reflect a lot of light from the set, giving the footage a glowing effect that makes the fur detail disappear. A black cat might be hard to colour correct.
  • Not Persian, Chinchilla, Angora, Siamese, Russian Blue or Egyptian. A luxury cat wouldn't work storywise: is hard to find one of these wandering around the streets, and if you do happen to find one, first thing you think is they belong to someone.


PROCESS:

All the footage would be recorded in a green screen room. The photo studio is located at Kingston University. No need to take the little one to the actual location where the action unfolds, it will be added later in postproduction. 


SHOTS:

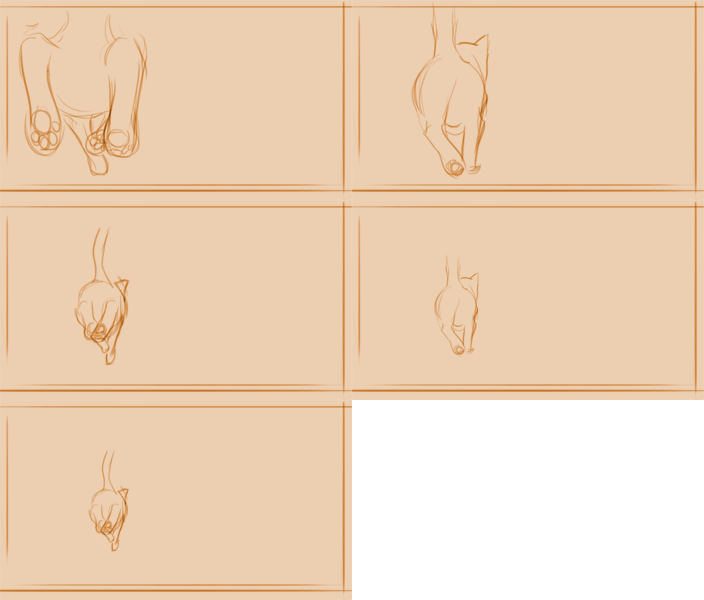
I've created a series of animated gifs, so you can have an idea of what the shots are and what the kitten should be doing in them. This is a rough, flexible guideline of what is needed, once on location we can adapt some angles or takes in order to fit them to what works best with the kitten. 

Scene 1:


Kitten enters to the scene. 
Is his first appearance so we only need for him to enter
 into frame, ideally looking away from the camera. Can 
be doing whatever he feels like. 


Scene 2:


From sit/wandering/whatever he was doing on the previous shot
to running out of frame. 


Scene 3:


Kitten running away from the camera.


Scene 4:


Couple of seconds of kitten sit still. Full front view.


Scene 5:


Shot taken slightly from above. This one needs to be 
pretty much exactly as depicted. 


Scene 6:


This is quite weird to depict in terms of what you would see
on screen, so I am adding a diagram here:


... basically we will tilt down the camera towards our sit 
kitten until it comes to frame and cross fingers he doesn't move. 


Scene 7:


Kitten turning his head up, looking and then jumping up
out of frame.


Scene 8:


Kitten approaching and licking a surface. We can try
this with some cat food juice or a little bit of milk. 


 Scene 9:


Some good amount of seconds of the kitten looking 
directly to the camera looking happy, so we will need
treats and cuddles :)


 Scene 10:


Kitten rubbing himself against something. Again, we
will have to make him happy. Angle and point of view
can change, important part is to capture the gesture.


Scene 11:


Kitten idling, then something grabs his attention and 
runs/walks towards that. 


Scene 12:


Kitten approaches someone with a bowl of milk. Ideally
a little girl between 6 and 9 years old... but given how 
difficult is to get a kitten and assuming will be even worse
with children, anyone can do. Must be female, though, 
and on her early twenties, tops. 


 Scene 13


Girl cuddles the little cat. Could even be the cat owner
if she fits the profile.  


Now, let's continue our search for our feline superstar!

martes, 7 de agosto de 2012

How to fix bad mirrored sculpting in zBrush

So I was happily sculpting my android girl...


 when I zoomed out and I realized that, for some reason, I had screwed the other half:


After panicking and yelling and running around the flat, I counted to ten and gave a shout to my friend David, wizard of zBrush (go, pay him a visit here: http://dgameprod.blogspot.co.uk/  ), who kindly guided me through the following method to correct the issue:

  1. You have to mask the half with good geometry: 


After that, go to the lowest subdivision level of your tool, and once there, scroll down to the "Deformation" menu. There is a button called "Smart ReSym". 


Click it and voilá!


Now you have to keep scaling up on each subdivision level, and do the same.


David's note: what this button does is to create an average on both sides of your geometry, if you don't mask your good side, it will average them both and both will change. That's also the reason why it works better if you do it subdivision per subdivision instead of the latest subdivision alone. Now... texture fun!


viernes, 20 de julio de 2012

Here comes a new challenge, Vol. II

In the last episode, Nell was jumping around happily due her victory against zBrush refusal to import OBJs, singing and yelling "in your face, destiny obstacles! I'm bigger than God B-)". Then the sky clouds opened, God shown his face, said "oh, yeah?" and this happened:


As we can see, our robot lady has a see through dress that should not be like that at all. Also, she missed an eye. No idea what is causing this, so back to Maya to play with the Cleanup... a bit to see if that fixes anything.  Brb.

-----------
UPDATE
-----------

Fixing the dress

After running Cleanup... I found this under nonmanifold geometry: 


Note: do not sew geometry as 
you would sew fabric in real life.

What I did at the time of modelling was creating some "volume" at the edges:


This was what triggered the problem. You solve it by doing the following:

  1. Delete all the attached faces from inside the geometry. This will leave some floating points at the same coordinates which will still cause problems, so...
  2. Get rid of those floating points. I do so by selecting the whole mesh and  hit "merge" (Edit Mesh > Merge) with a narrow margin, so all the overlapping vertex combine into one).
  3. Then, once fixed, you invert and then conform the normals. This is what actually triggers the "transparency" error, but just inverting the normals doesn't fix the issue if the previous steps are not made beforehand, for some reason.
Fixing the eyes.

This does gets solved with just inverting the normals of the missing eye :)


Here comes a new challenge!

So, I've been polishing the previous model:


Previous model, polycount optimized


New model, now polycount optimization free! 

Now, I am ready to take the model parts into ZBrush to start the normalmaps, and suddenly...


Chrestomathy

Before ruining Lee's vacations with my cries for help, I'll try to solve the issue by myself with the superpower of Google. Will keep updating this entry until I find a solution, or until I end up running after Lee crying for help :)

I remember in a previous exercise something similar happened. The problem was the model had faces with more than 4 vertex so I went back to Maya to run a poly cleanup (Mesh > Cleanup...  and, under "cleanup effect", "select matching polygons" and marking "faces with more than 4 sides"). I did actually find a couple of faces with more than 4 sides inside the nose, so I proceeded to subdivide them:


Chrestomathy Vol. II

Yet still this didn't solve the problem. Will keep on trying...


-------------------------------

UPDATE:

A TopoGun Forum User got the same problem, he says:

It seems that zbrush have problems with the floating vertex. So thats a thing we topogun - zbrush users should be aware of.


So I went to Cleanup... and played around with all the options in there. Found nonmanifold geometry in the lips caused when I merged the flipped halfs: upper and lower lips were merged together by the center. Detached merged vertex there. Still no luck.


-------------------------------


An user named "green" in the DigitalTutors forum suggested "Try deleting the history on the object before exporting, and in the .OBJ export options, try turning Groups, Point Groups, Materials, Smoothing, and Normals to Off."  Done that. No luck.

-------------------------------

Solved! 

Instead of exporting the OBJ from Maya and importing in zBrush, I exported from Maya, imported the OBJ into a new scene again in Maya, and exported the OBJ from there again. This one loads into Zbrush with no problem :)


Silly software...